Bike Fitting for Dynamic Riding on a Mountain Bike
“How positioning for dynamic mountain biking is different from that for long XC rides”
By Lennard Zinn
There is a big difference between setting up a mountain bike for long cross-country or dirt road riding vs. for dynamic trail riding, pump tracks, and bike parks. The former is for extended seated riding, while the latter type of riding is more dynamic, so the fit reflects that. Dynamic riding refers to riding any trail with features such as rocks, roots, rollers, corners, berms, technical climbs, and long downhills. We offer both kinds of fittings here at Zinn Cycles.
For cross-country mountain bike riding on very smooth non technical trails, the position on the bike can be similar to a position for road, gravel, or cyclocross but with an MTB handlebar, not a drop bar. That kind of position will not do you much good for ripping down bumpy trails or maneuvering a bike through a pump track, or climbing technical features.
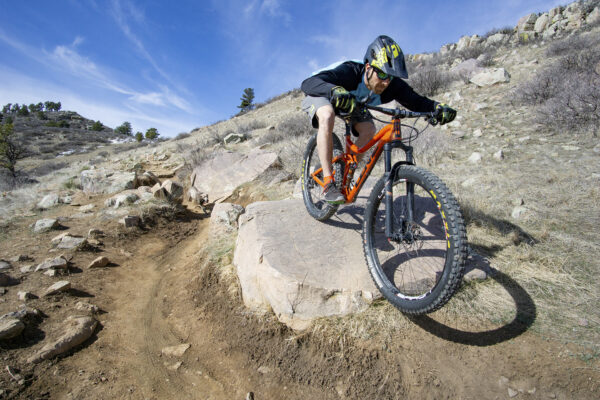
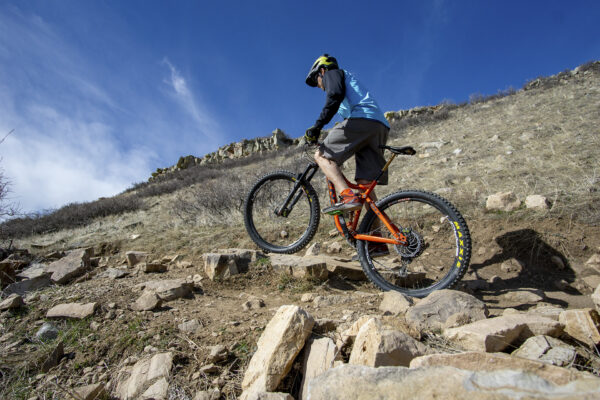
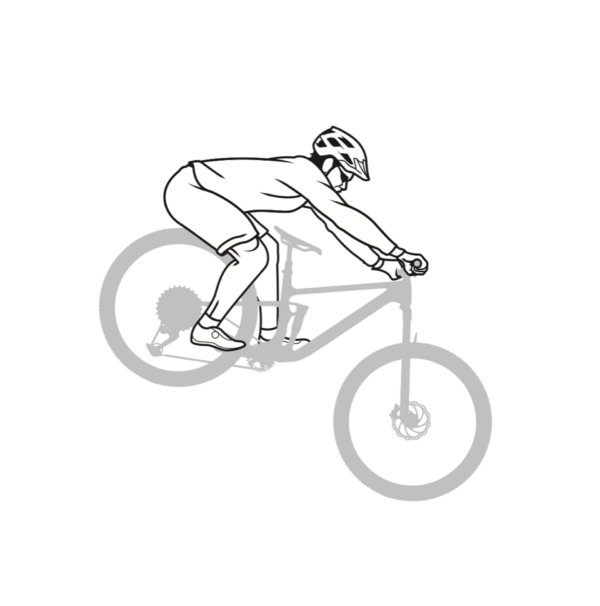
Aggressive descending on a trail
Bike positioning for MTB cross-country (and road, gravel, and cyclocross) is primarily concerned with four details: saddle height, saddle setback, saddle-to-bar reach, and saddle-to-bar drop. Almost daily, I fit people on road and gravel bikes optimizing those four parameters.
Bike frames are generally sized for the location of the top of head tube relative to the bottom bracket; this determines a possible range of locations of the handlebar relative to the bottom bracket on the complete bike. This was more easily measured on lugged frames with level top tubes, which were sized by the length and angle of the seat tube and length of the top tube, which determined whether the saddle and handlebar could be in the right positions relative to each other on the complete bike. Nowadays, frames have sloping top tubes and are sized using stack and reach, which I explain here, since this is more useful than the length of an imaginary horizontal top tube meeting a seat tube with an imaginary length longer than actual.
When mountain biking on technical trails, however, you won’t be sitting on the saddle when you’re descending or negotiating up a rocky climb, so you want to optimize a dynamic standing position, not a sitting one. And rather than being interested in the magnitude of the handlebar stack (Y) and handlebar reach (X) like on a cross-country bike, you are instead interested in the hypotenuse of the triangle whose legs are those two dimensions. We call this hypotenuse the “R.A.D.” and try to ensure that a critical dimension of the rider’s body matches it in length.
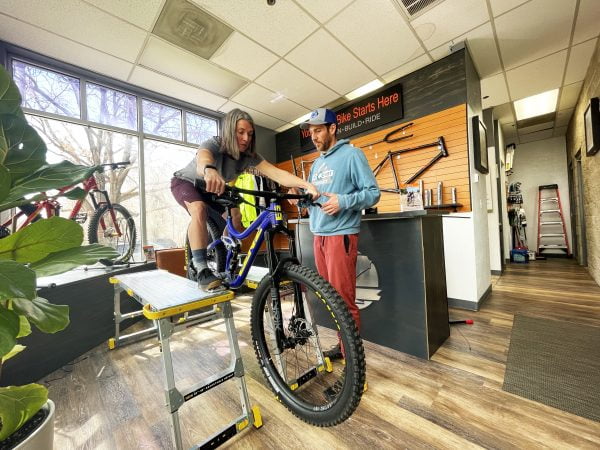
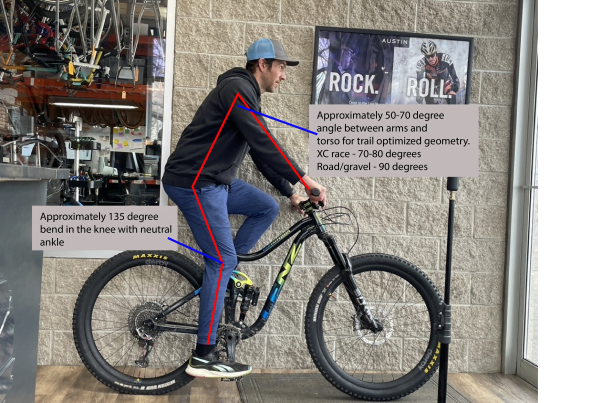
When we at Zinn Cycles position a rider on his or her bike for dynamic riding on bumpy and technical terrain, we employ the RideLogic fitting system created by renowned local (Boulder, CO) mountain bike coach Lee McCormack. It’s focused on out-of-the saddle handling for technical riding at speed and will best allow you to manual (pull up the front wheel while coasting), wheelie (pull up the front wheel while pedaling), hop, pump, drop, jump, rail corners, and climb/descend rough trails. Once the RAD is dialed in, seat height is set for optimal seated pedaling. The rider than easily adjusts to the saddle to bar position and should be in a similar seated position as the below image.
Since RideLogic positioning bases the location of the handlebar on the location of the feet to produce a dynamic standing position, the saddle-to-bar reach and saddle-to-bar drop or rise are incidental, rather than something to be aimed for.
Dynamically negotiating drops requires pushing the handlebar forward and your butt back with your body folded in a deep hinge at your hips (Fig. 1, above and below); a dropper post ensures that the saddle doesn’t restrict you from doing that.
Fig. 1 Body position to negotiate a steep drop –illustration by Mike Reisel
Body position to negotiate a steep drop
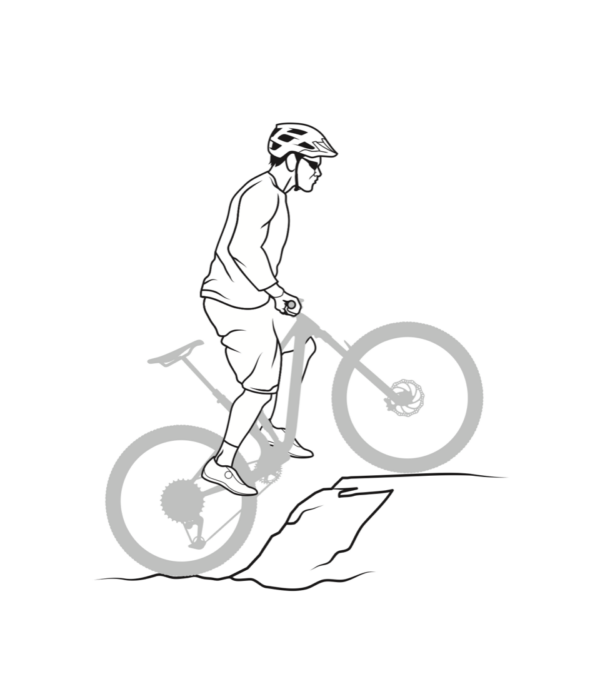
At the other extreme is the power position for climbing a ledge, or uncorking a huge “bunny hop,” or blasting out of a starting gate, all maneuvers in which you snap the grips toward your hips while explosively pushing against your feet, straightening your entire body (Fig. 2, below), and thus leveraging your front wheel up.
Fig. 2 Body position to jump up and over an object
When you ride through a series of bumps, your arms pull the bars back toward you through the troughs and push the bars away from you across the crests. At the same time, your feet move up and down with the bumps like a mogul skier. If you attend a BMX race or visit a pump track, you can observe riders use this swinging of the bar away from the body and back toward the hips as their body hinges and extends over every bump in real time. As you gain skill, these movements will become integrated into an elliptical row/anti-row pattern that is fast and powerful, so the relationship between where your feet are relative to your handlebar is critical.
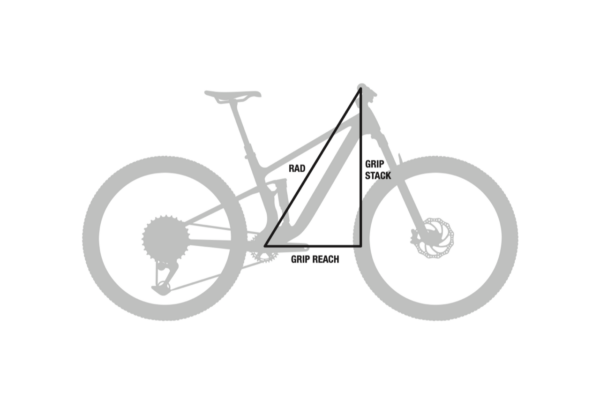
In RideLogic fitting, the critical distance is from the bottom bracket to the midpoint between the two grips; McCormack calls this the “Rider Area Distance” (the “R.A.D.” I mentioned above; see Fig. 3, below).
Fig. 3 R.A.D., grip stack, and grip reach
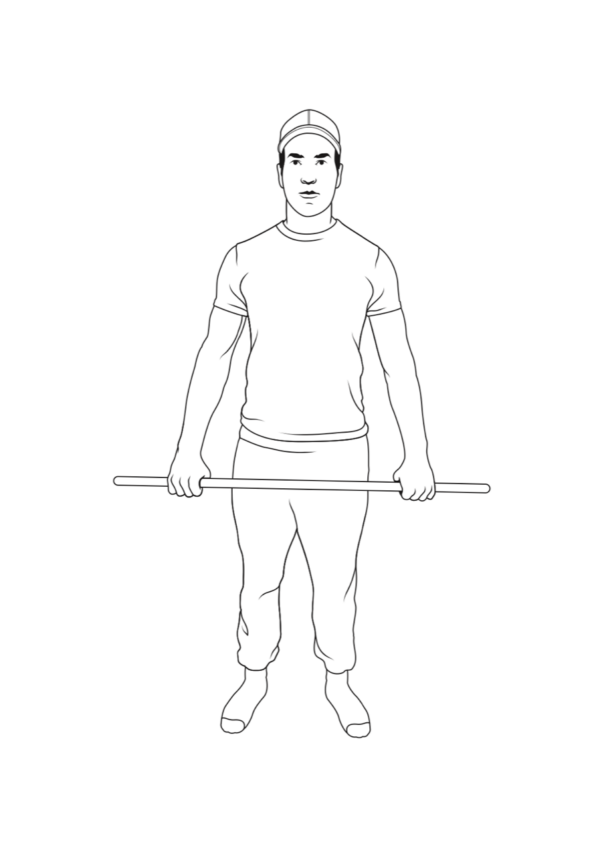
To be able to stand up straight on the pedals and most powerfully pull the handlebar back to your hips while going up a ledge or a steep bump (Fig. 2), the R.A.D. should be the same as the distance from the floor to a broomstick you hold against your thighs when standing up straight in your cycling shoes with your shoulders back and arms pushed straight down (Fig. 4).
Multiplying your height in centimeters by 2.5 gives a good estimate of the frame reach in millimeters that will result in ideal R.A.D. of the assembled bike. For instance, if you are 180cm tall, choose a bike with a frame reach around 450mm (180 x 2.5 = 450). It’s easy and a way better than saying, “I’m a big guy, so I will buy a size Large.”
Measure what R.A.D. (Fig. 3) is ideal for you:
1. Stand up straight in your cycling shoes.
2. Pull your shoulders back and push your clenched fists straight down.
3. Have somebody measure up from the floor to your first knuckle (Fig. 4). This is your ideal R.A.D.
As I said, R.A.D. is the hypotenuse of the right triangle (Fig. 3) whose legs are, first, the grip reach (or “grip X,” meaning the horizontal distance from the bottom bracket to the grip intersection) and, second, the grip stack (or grip Y; the vertical distance from the bottom bracket to the grip intersection). Since R.A.D. is a projected distance to the grip, you measure it from the center of the bottom bracket to the center line between the grips. So, with a straight handlebar, measure to the center of the bar adjacent the stem. With a riser bar, measure instead to a string pulled taut between the grips.
Increasing either stack or reach of the frame, or grip reach of the bike, increases R.A.D. and vice versa. On a modern trail or downhill-oriented bike, the short stem, minimal headset spacers, and fork steerer already cut to length means that the only way to decrease its R.A.D. is to get a handlebar with less rise, and that won’t make much of a change. So, pick the right bike size to start with! Some bike geometry charts like this one show R.A.D. (or a range of R.A.D. achievable with that frame). If your bike’s geometry chart does not, however, you can compare the 2.5 multiplied by your height in centimeters with the frame reach on its chart.
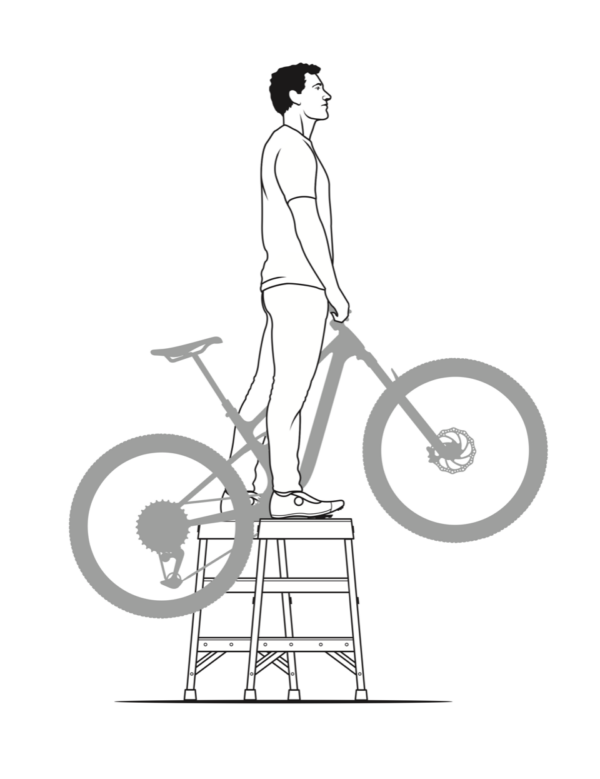
Obviously, you cannot set a rider up on their bike for this type of riding in the traditional way by observing them riding their bike on a stationary trainer. However, there is an equivalent method where you can both see and feel R.A.D. in a stationary environment. It’s the way we fit people to this type of bike at Zinn Cycles, and you can do it at home if you have two sturdy step stools or folding workbenches of equal height available.
Put one pedal of the bike on each step stool or workbench. Climb up, stand with one foot on each pedal, and grab the grips (Fig. 5). The bike will swing around the bottom bracket as you push and pull the grips away from and toward you. Next, stand up straight on the pedals and pull your shoulders back while you pull the grips back until the bar hits your legs (Fig. 5). If the bike’s R.A.D. is correct for you, your arms will be straight, as in Figs. 4 and 5. If your arms are bent, then the R.A.D. is too long. If you must open your fist to maintain contact with the bar, then the R.A.D. is too short.
Fig. 5 Setting the bike’s pedals on two step stools. Standing on the pedals, you can swing the bike through an arc around the bottom bracket to check that its R.A.D. is correct for you. You can also pull the bar to you and feel the position to attain when lifting the front wheel or push it away and feel how to hinge your body when going over a dropoff.
You can schedule a Ride Logic fit with Nick at Zinn Cycles here. (And you can schedule a fit for seated riding with Lennard here.)
For more depth and detail on RideLogic fitting, go to leelikesbikes.com and/or read his book, Dialed.
Below shows a photo of an actual Ridelogic bike fit in progress at Zinn Cycles.